The toy industry has undergone a significant transformation with the advent of 3D printing technology. According to a recent report by the Consumer Technology Association, the global 3D printing market for toys is expected to grow by 25% over the next five years. This growth reflects a shift towards customization and rapid prototyping, crucial for keeping up with consumer demands.
Experts like Dr. Emily Carter, a leading figure in 3D printing innovations, state, "3D printing opens up new avenues for creativity and efficiency in the toy design process." This technology empowers designers to create unique prototypes that are often both functional and affordable. The ability to iterate rapidly reduces time from concept to production.
However, not all toy creators are utilizing this technology effectively. Many still rely on traditional manufacturing methods, which can limit creativity. Embracing 3D printing is more than just adopting new technology; it requires a shift in mindset. As the industry evolves, understanding "How to use 3D printing for custom toy prototypes?" will be essential for staying competitive in a fast-paced market.
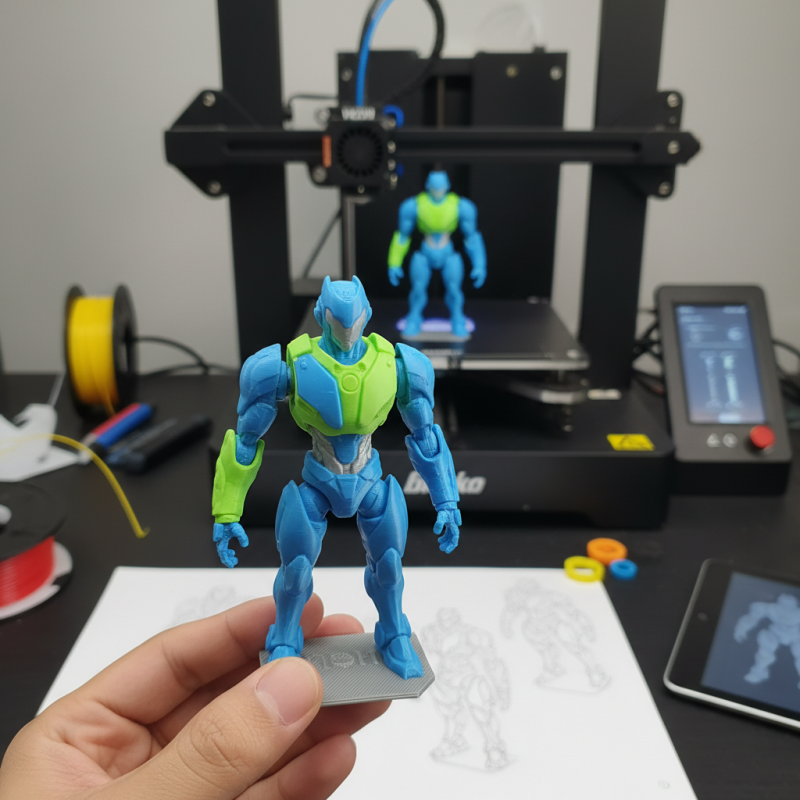
3D printing has revolutionized the toy prototyping process. Understanding its technology is crucial for creating custom toys. It offers a level of customization that traditional methods cannot match. Designers can easily create intricate details and unique shapes. This technology allows rapid iterations, enabling quick testing of ideas. Toy developers can be innovative without large investments.
Tips: Start with a simple design. Complex shapes may lead to printing errors. Testing different materials is essential. Some materials are easier to print than others. Flexibility in design can yield unexpected results. Embrace mistakes. They can guide your next prototype.
Consider also the size of your prototypes. Smaller models can often reveal flaws more easily. Analyze how the toy will be used. Functionality is as important as aesthetics. Printing challenges often arise with complex mechanisms. It is vital to plan your design carefully. Adjustments during the design phase can save time later.
Reevaluate your prototypes regularly. What works on paper may not function in reality. Feedback from potential users can be invaluable. Iterating based on actual experiences leads to better designs. Embrace the learning curve. Each prototype presents an opportunity to improve.
When creating custom toy prototypes, the choice of 3D printing materials is critical for durability and safety. A report by Smithers Pira indicates that the global market for 3D printing materials is expected to reach $4.7 billion by 2025. This growth reflects an increasing awareness of material properties among designers and manufacturers. Safety is a top priority, especially for children’s toys. It is essential to choose non-toxic and durable materials that can withstand rough handling.
Commonly used materials include PLA, ABS, and TPU. PLA is biodegradable and considered safer than other plastics. However, it can be less durable under stress. ABS is stronger but poses risks due to toxic fumes during printing. TPU strikes a balance with flexibility and durability but might be more challenging to print accurately.
Using certified or tested materials can mitigate risks. Data from the Consumer Product Safety Commission indicates that toys made with safer materials show 30% fewer incidents of injury. However, not all materials are created equal, and optimization is key. Prototyping requires an iterative process. A careful evaluation of properties like flexibility, impact resistance, and heat tolerance will lead to better products. Exploring lesser-known materials could also yield surprising benefits, but the learning curve might be steep.
Designing custom toy models can be an exciting journey. Using 3D modeling software, you can create detailed and imaginative designs. Begin by sketching your ideas on paper. This initial concept allows for exploration of shapes and sizes. Once you have a clear vision, transition to digital tools to refine your model. Programs like CAD software provide precision and adjustability.
While working with 3D software, consider the functionality of your toy. Is it meant to move, or simply look appealing? Think about materials to use in 3D printing. Different plastics yield varying strengths and aesthetics. Some designs may require iterations. Expect some trial and error; a perfect model may not appear immediately. Each iteration teaches valuable lessons about balance, stability, and detail.
Additionally, user feedback is essential. Share your designs with potential users or fellow designers. Their insights can unveil unexpected flaws or areas of improvement. Remember, the design process embraces imperfections. Embrace critiques; they lead to better products. Custom toy prototypes are an evolving craft that thrives on exploration and feedback. Prepare to adapt and grow through each stage.
When preparing a model for 3D printing, slicing is a crucial step. Slicing software converts your 3D design into layers. Each layer corresponds to a single pass of the printer's nozzle. Experts suggest this process impacts the final product's strength and detail. For instance, using a layer height of 0.1mm can greatly enhance fine details but will increase print time.
The choice of slicing settings can make or break a prototype. Industry data indicates that 70% of print failures stem from improper slicing. Settings such as infill density and print speed directly influence durability. High infill density can create a solid feel, but it may lead to longer print times. Conversely, lower infill offers faster results but could compromise strength. It’s essential to find a balance that meets the design intent.
While there are many slicing software options available, not every tool suits every project. Experimentation is often required to discover what works best for specific designs. Some users report mixed results with default settings. Adjusting parameters like print speed and temperature can yield different outcomes. This process of trial and error fosters learning and refinement in prototyping.
| Dimension | Data |
|---|---|
| Model Type | Action Figure |
| Material | PLA Plastic |
| Print Speed | 60 mm/s |
| Layer Height | 0.2 mm |
| Infill Percentage | 20% |
| Printing Time | 2 hours 30 minutes |
| Post-Processing | Sanding and Painting |
| Prototype Purpose | Market Testing |
Prototyping custom toys through 3D printing is a powerful approach. It allows designers to efficiently test their ideas. Each iteration gives insight into potential flaws and areas for improvement. An iterative process is essential for refining prototypes. Initial designs may not always meet expectations. It's crucial to identify specific aspects that need tweaking.
One helpful tip is to create simple models first. This reduces costs and time. Focus on the overall shape before adding intricate details. Test these simple versions to gauge basic functionality. Once you are satisfied, gradually integrate more complex features.
Another consideration is material choice. Different materials yield varying results. Some may seem appealing but not perform well under stress. Experiment with various options before settling on the final design. This can be a trial-and-error process that reveals inconsistencies.
Iterative printing is about improvement. Document every version you produce. Reflect on what works and what doesn’t. This feedback loop strengthens your final product. Remember, the goal is to evolve your toy prototype systematically.
: 3D printing offers unmatched customization. Designers can create intricate details and unique shapes easily.
Beginners should start with simple designs. Complex shapes can lead to printing errors and frustrations.
Testing different materials is vital. Some materials print easier but may lack durability or safety.
Smaller models can reveal flaws more easily. They help in evaluating both functionality and aesthetics.
Feedback from potential users is invaluable. It guides necessary iterations and improvements in design.
Prototypes should be reevaluated regularly. What works in theory may not translate to practical use.
Documenting versions helps identify what works and what doesn't. This improves the final product systematically.
Common materials include PLA, ABS, and TPU. Each has its pros and cons regarding safety and durability.
Iterative processes reveal flaws and areas for improvement. They lead to a stronger final product.
Designers should embrace mistakes. Mistakes can provide valuable insights for future prototypes.
In the article "How to Use 3D Printing for Custom Toy Prototypes?", the focus is on leveraging 3D printing technology to create unique toy prototypes that cater to specific design needs. The process begins with a fundamental understanding of 3D printing technology, highlighting its significance in toy prototyping. Selecting the appropriate materials for durability and safety is crucial, ensuring that the final products meet both aesthetic and functional requirements.
Designing custom toy models can be efficiently accomplished using 3D modeling software, which allows for detailed customization. After creating the model, it is essential to prepare and slice it properly for the 3D printing process. The article emphasizes the importance of testing and refining prototypes through iterative printing, allowing designers to make improvements and adjustments based on practical feedback. This comprehensive approach provides a solid foundation for anyone looking to explore how to use 3D printing for custom toy prototypes.
Kasten Toys