Vinyl toys have gained immense popularity due to their vibrant colors and unique designs. However, one common issue that collectors face is paint chipping. This can detract from the toy's aesthetic appeal and reduce its value. Many wonder, "How to seal paint on vinyl toys to prevent chipping?"
Sealing paint on vinyl toys is crucial for preserving their beauty. A properly sealed surface can resist wear and tear better over time. It enhances the durability of the paint and allows the toy to withstand handling without losing its charm. However, it’s not always straightforward. One may find that certain sealants work better than others. Each brand and type can have distinct characteristics that affect the final outcome.
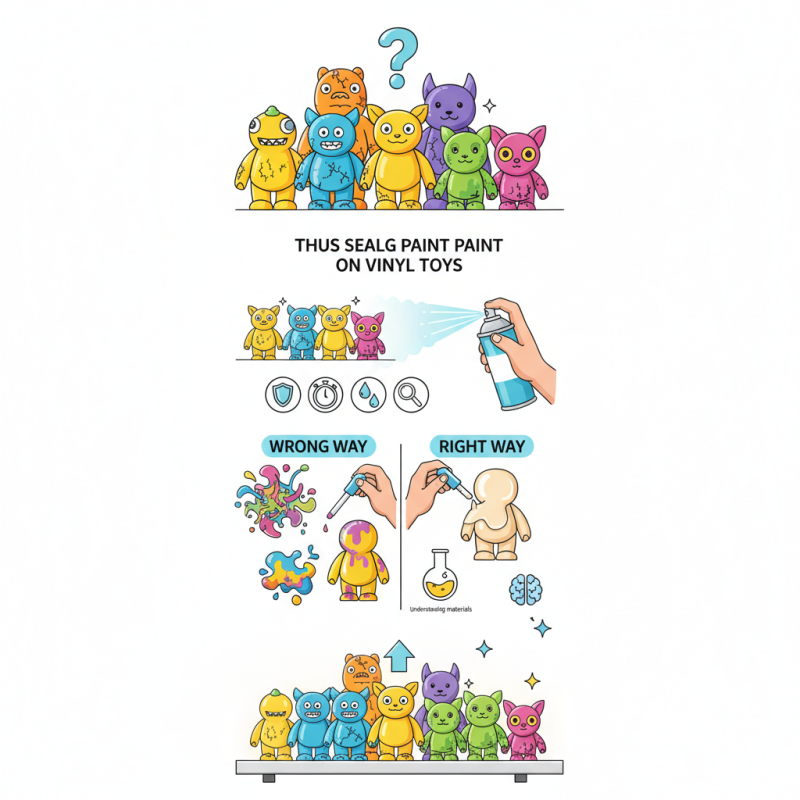
Experimentation is often necessary. You may encounter unexpected results, like uneven finishes or reactions with the paint beneath. This can be both frustrating and enlightening. Understanding the materials involved will lead to better choices. In the end, finding the right method for sealing your vinyl toys can significantly elevate their longevity and visual appeal.
When choosing paint for vinyl toys, the type matters significantly. Acrylic paint is often recommended. It's water-based and non-toxic. This makes it safer for children and environmentally friendly. Acrylics bond well with vinyl surfaces. However, they can chip if not sealed properly.
Another option is spray paint. It provides a smooth finish and covers large areas quickly. But it requires careful application. Overspray can ruin other parts of the toy. Both acrylic and spray paints can be fragile. Therefore, a good sealant is crucial for long-lasting results.
Not every paint works on vinyl. Testing a small area can prevent unexpected issues. Some paints may not adhere well. You might find uneven textures or peeling. It's a good reminder to experiment and reflect on your choices. Observing how the paint interacts with your vinyl can guide better decisions in the future.
Preparing the surface of vinyl toys is crucial for optimal paint adhesion. Start by cleaning the toy thoroughly. Use warm, soapy water to remove dust and oils. Ensure it is completely dry before proceeding. Any residue can prevent paint from sticking properly.
Next, consider sanding the surface lightly. A fine-grit sandpaper works best for vinyl. Gently scuff the area where you plan to paint. This process creates micro-abrasions that help the paint grip better. It’s easy to overdo it, so be cautious. A little sanding can go a long way.
Applying a primer is another important step. Choose a primer designed for plastic and vinyl materials. A good primer can seal the surface, reducing chipping risks. Apply it in thin, even coats. Allow it to dry as per the manufacturer’s instructions. This preparation phase is essential. Skipping it may lead to poor paint adherence and future chipping.
When painting vinyl toys, achieving a smooth finish requires careful techniques. Start by cleaning the toy surface thoroughly. Use mild soap and water to remove any dust or oils. Allow the surface to dry completely. This step is crucial for paint adhesion.
For application, consider using airbrush techniques for a fine mist of paint. This method allows for an even coat and reduces the risk of drips. If using a brush, choose one with soft bristles. Dip it lightly in paint and apply in thin layers. Avoid excessive pressure; this helps avoid brush strokes.
**Tips:** Work in a well-ventilated area to ensure an even drying process. Use masking tape to cover areas you don’t want to paint. Experiment on scrap vinyl to perfect your technique.
Don’t hesitate to reflect on your progress. It’s okay if your initial layers aren’t perfect. Often, small imperfections can be corrected in subsequent layers. Always let each coat dry fully before applying the next. This patience will pay off in the end, providing a durable finish that resists chipping.
| Technique | Description | Benefits |
|---|---|---|
| Base Coating | Applying a primer to ensure better paint adhesion. | Improves paint durability and prevents peeling. |
| Layering | Applying multiple thin coats of paint rather than one thick coat. | Reduces the risk of chipping and provides a smoother finish. |
| Sanding Between Coats | Lightly sanding the surface between layers of paint. | Enhances adhesion of subsequent layers for a flawless finish. |
| Top Coating | Using a clear sealant or top coat after paint is dry. | Provides added protection against scratches and UV damage. |
| Curing Time | Allowing adequate time for each coat to cure. | Ensures full chemical bonding of the paint layers. |
When selecting a sealer for vinyl toys, it's essential to consider the material properties. Vinyl has a unique finish that can be sensitive to certain chemicals. According to the American Coatings Association, the wrong choice of sealer can lead to adverse reactions. Always review the product specifications before applying. Many manufacturers recommend using a polyurethane or acrylic-based sealer for optimal protection.
Application methods also vary and can influence the outcome. Brushing can sometimes leave streaks, while spray application offers a more even finish. Reports suggest that a consistent, thin layer of sealer will enhance durability. However, achieving a perfectly smooth application can be challenging. Some hobbyists report experiences where uneven coatings led to peeling.
Surface preparation is another crucial factor. Cleaning the toy thoroughly can remove contaminants that affect adhesion. Interestingly, a study by the Society of Plastics Engineers indicated that proper surface preparation can improve sealer efficiency by up to 40%. Yet, many overlook this step, resulting in less than satisfactory results. Achieving a flawless finish requires practice and attention to detail.
Curing and maintaining sealed vinyl toys can greatly extend their lifespan and prevent chipping. After sealing your toys, it's important to let the sealant cure properly. This process can take anywhere from 24 to 72 hours, depending on the materials used. Humidity and temperature can affect curing times, so try to keep them in a controlled environment. This can be a simple, dark place to minimize exposure to moisture and light.
Regular maintenance is also key. Dust can accumulate and wear down the sealant over time. A soft cloth or a gentle brush can help keep your toys clean without scratching the surface. However, remember that even gentle cleaning might cause some wear. Check for small chips or cracks periodically. Addressing these issues early can save you from larger repairs later on. Invalidating the integrity of the sealant can lead to major problems, so stay vigilant. Your vinyl toys are not just collectibles; they are art pieces that require care and attention.
: Clean the toy surface with mild soap and water. Ensure it dries completely for better paint adhesion.
Airbrush techniques provide an even coat. If using a brush, use soft bristles and apply thin layers.
Apply paint lightly and avoid excessive pressure. Thin layers will help achieve a smoother finish.
Always let each coat dry fully. Patience is key for a durable finish that resists chipping.
Allow the sealant to cure for 24 to 72 hours in a controlled, dark environment.
Dust regularly with a soft cloth or gentle brush. Check for chips or cracks periodically.
Even gentle cleaning can wear down the sealant. Take care to avoid scratches.
Invalidating the sealant can lead to bigger issues. Early detection of problems is crucial for maintenance.
Yes, small imperfections can often be corrected in future layers. Reflect on your progress as you paint.
To effectively address the question of "How to seal paint on vinyl toys to prevent chipping?", it is essential to follow a systematic approach. Begin by choosing the right type of paint that adheres well to vinyl surfaces, which is crucial for a smooth application. Preparing the surface appropriately enhances paint adhesion, ensuring longevity and durability. When applying the paint, using techniques that promote an even finish will contribute to a professional look.
After the paint has dried, selecting the right sealer specifically designed for vinyl toys will provide an extra layer of protection against chipping. Finally, proper curing and maintenance of the sealed vinyl toys, such as storing them away from direct sunlight and handling them with care, will further ensure their vibrant appearance and integrity over time. By adhering to these steps, you can successfully protect your painted vinyl toys from damage.
Kasten Toys