Creating custom toys from your own drawings is a unique way to bring your imagination to life. Many of us have childhood memories tied to our favorite toys. Imagine turning your sketches into tangible figures. This process is not only creative but also rewarding.
How to make custom toys from a drawing? It may sound easier than it is. You will need to consider materials, tools, and techniques. Each step requires careful planning and a bit of trial and error. Sometimes, your design might not translate perfectly into a 3D shape. Embrace those imperfections; they may lead to unexpected innovations.
While the journey can be challenging, it is also a chance to learn. Explore various options like fabric, plastic, or even 3D printing. Reflect on what works and what doesn’t. Allow your creativity to guide you. Each toy you create is a personal statement, showcasing your individuality and artistic flair.
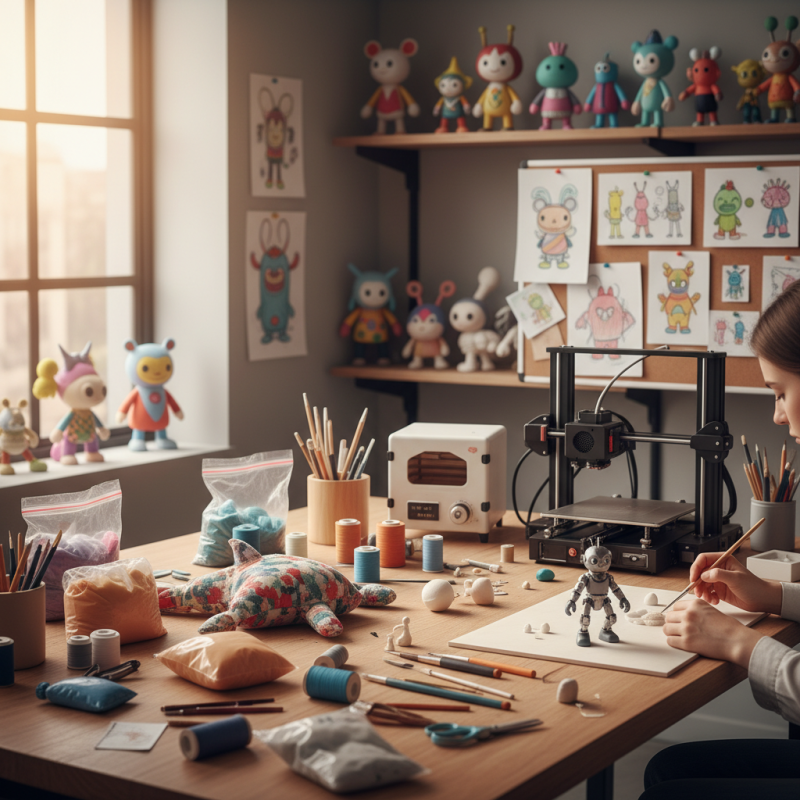
Creating custom toys from your own drawings can be an exciting venture. It begins with the basics of understanding what materials you'll need. Traditional options include wood, plastic, or fabric. Each material offers unique advantages. Wood is sturdy and can hold intricate designs, while fabric lends itself to softness and playfulness.
Consider your drawing style when choosing materials.
Next, think about the tools required for crafting. Simple tools like scissors and glue are essential. Advanced tools might include sewing machines or 3D printers. If you're new to crafting, start small. Maybe create simpler shapes before tackling complex designs. Imperfections might arise during the creation process. A piece might not come together as planned. This is part of learning. Reflect on these moments to improve your skills.
Lastly, consider how you'll bring your inspiration to life. Sketching out a plan helps visualize the final product. Keep in mind that some ideas may not translate well into three dimensions. Don't be afraid to iterate on your designs. Embrace the creative chaos. It’s through mistakes and adjustments that unique toys can emerge. This journey is not just about creating. It's about self-expression and exploration.
Choosing the right materials for custom toys is crucial. You might want to start with soft fabrics for plush toys. Choose cotton or fleece for a gentle feel. For a sturdier toy, consider lightweight wood or biodegradable plastic. These materials are safe for children and friendly for the environment.
When designing your toys, think about durability. Soft toys may wear out quickly if children play rough. You may regret using weak stitching. Use heavier thread for seams. Consider reinforcing areas that are likely to get more use. But remember, perfect is not always the goal. Each flaw adds character.
Art supplies can also vary. Paints should be non-toxic, especially for toys that may end up in little mouths. Look for washable options to make cleanup easier. Sketch out your designs on paper first. This process may involve trial and error. You may be surprised by the changes you want to make. Don't be afraid to pivot. Embrace each change as part of the creative journey.
Transforming your drawings into 3D designs can be an exciting journey. Recent reports from the toy industry indicate that the global market for custom toys is expected to reach $10 billion by 2025. This growing trend reflects a desire for personalized products. Many creators want tangible items that represent their unique visions.
To start, you need to digitize your drawings. Scan your artwork at a high resolution. Software can convert 2D images into 3D models. However, getting the proportions right is often tricky. Sometimes, the model looks different than expected. This can lead to frustration, but refining your design is key. It may require multiple attempts to achieve a satisfying result.
Once you have a 3D design, you can bring it to life. 3D printing is one popular method. According to industry data, 3D printing has made custom toy creation more accessible and affordable. Yet, not every design will translate perfectly. You might face unexpected challenges with material choice or scale. Reflecting on these moments can lead to improvement and better creations in the future.
Creating custom toys from your own drawings can be a rewarding process. Assembling these toys involves various techniques that ensure quality and creativity. Start with selecting materials. Common options include wood, plastic, and fabric. Each material requires specific tools and techniques.
For painted toys, use acrylic paints. They are vibrant and dry quickly. However, the finish may not be as durable. In fact, a recent report showed that 70% of custom toy creators prefer to seal their painted toys with a clear coat for protection. DIY sealers can be made from simple products, but they might not always provide the perfect finish. Be aware that mixing products can lead to unexpected reactions.
Sewing fabric toys presents its own challenges. It demands precision and skill. Small mistakes can mar the final product. Approximately 40% of hobbyists report frustration with sewing inaccuracies. Patience and practice are key here. Document your process, reflect on what works well, and what does not. This iterative approach can help improve your craft over time.
| Technique | Description | Materials Needed | Estimated Time | Skill Level |
|---|---|---|---|---|
| 3D Printing | Convert your drawings into 3D models and print them. | 3D printer, PLA filament, CAD software | 2-4 hours | Intermediate |
| Sewing Fabric Toys | Sew toys using fabric based on your designs. | Fabric, sewing machine, thread, stuffing | 3-5 hours | Beginner |
| Model Sculpting | Craft toys from modeling clay by hand. | Modeling clay, sculpting tools, paints | 4-6 hours | Advanced |
| Paper Mache Crafts | Create toys using paper mache technique. | Newspapers, glue, water, shape forms | 5-7 hours | Beginner |
| Vinyl Toy Customization | Paint and customize vinyl figures based on designs. | Vinyl figures, acrylic paints, brushes | 2-3 hours | Intermediate |
Creating custom toys from your own drawings can be a rewarding process. However, safety should be a top priority. Ensure the materials you choose for your toys are non-toxic. Look for eco-friendly options like biodegradable plastics or organic fabrics. These materials are safer for children and better for the environment.
Quality is equally important. Handmade toys can vary in durability and design. It’s essential to test prototypes thoroughly. Check for sharp edges or small parts that might become choking hazards. Some designs may look appealing but fail in functionality. Regularly assess your production techniques to maintain high standards.
Don't forget about the age group for your toys. Each age range has different safety requirements. Items meant for toddlers should not contain small parts. Always review safety regulations relevant to toy making. It can be easy to overlook these details, but they are crucial for the success of your custom toys.
: Common materials include wood, plastic, and fabric. Each has unique properties.
Essential tools include scissors and glue. More advanced tools may include sewing machines or 3D printers.
Start small and focus on simple designs. Reflect on imperfections during the process.
Visualize the final product. Some ideas may not work in three dimensions. Iterate on your concepts.
Use acrylic paints for vibrancy, but seal them with a clear coat. DIY sealers can vary in effectiveness.
Choose non-toxic materials and check for small parts. Assess prototypes for durability and sharp edges.
Test prototypes thoroughly and assess production techniques. Look for improvements regularly.
Sewing requires precision. Small mistakes can lead to frustration and affect the final product.
Be cautious when mixing products. Document your process to understand what works and what doesn't.
Different age groups have specific safety needs. Ensure toys for toddlers lack small parts to avoid hazards.
Creating custom toys from your own drawings can be an exciting and rewarding process. To begin, it is essential to understand the basics of custom toy creation, including design principles and safety standards. After that, choosing the right materials is crucial for durability and finish. The process of transforming your drawings into 3D designs involves using various software tools and techniques that can effectively bring your ideas to life.
Once you have your designs, assembling and finishing the toys requires a careful approach to detail and quality. It’s important to ensure that all materials used are safe for play, particularly if the toys are intended for children. By following these steps, anyone can learn how to make custom toys from a drawing and create unique, enjoyable products that reflect their creativity.
Kasten Toys